- Articles Index
- Monthly Features
- General History Articles
- Ancient Near East
- Classical Europe and Mediterranean
- East Asia
- Steppes & Central Asia
- South and SE Asia
- Medieval Europe
- Medieval Iran & Islamic Middle East
- African History (-1750)
- Pre-Columbian Americas
- Early Modern Era
- 19'th Century (1789-1914)
- 20'th Century
- 21'st Century
- Total Quiz Archive
- Access Account

The Battle of Issos (Issus)
By Maciek
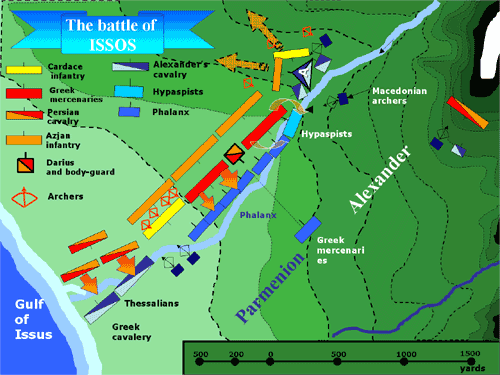
I The first two 2-D graphics are based on illustrations from Fuller's book. I have to add that Fuller almost trusted completely in Arrian's version so his Idea of the battles is most reliable. I have distinguished the terrain figures because in this battle it was the decisive element. The very narrow area of operation determined that the Persians could only place a few rows of their soldiers which is shown on the map as two echelons. Also, Darius made a maneuver with part of his cavalry - in his left wing he sent his cavalry unit to the left forward to attack Alexander's right. He also surprised the Macedonians with his second maneuver by sending a huge part of his cavalry from his left to right wing, where the terrain was much better for charges. He hoped to break the line of Thessalian's commanded by old Parmenion. This was very close to bein successful as we will see in the following stages of the battle. But Alexander saw both of this moves and sent two small detachments to the right (Agrians and light cavalry) and a great number of his cavalry to the left wing to prevent the Persians from breaking through. If the Persians did break the formation of the much smaller army of Alexander, it would inflict tragic consequences on the Macedonians because their success depended on the strong infantry in the middle that held off the Persian center (even much superior in number). This time was crucial for Alexander's attack in the enemy wing.
II Following the documentary movie "In the footsteps of ATG," which had a great influence on me, I would like to show the idea of the first echelon of bowmen who attacked the Persian left. They had to take advantage of the intervals in the enemy's formation and withdraw very quickly to the rear. The attack was so furious and fast that the Persian plan collapsed. The Persian archers and Cardaces' (Although trained from a very young, they had no experience at all) units could not quickly organize, and were caught by surprise (in spite of their "fire"). The Cardaces who were mixed with archers went into a panic and the left wing became weak and unstable. But all this was not because of weakness and the Persian army or their bad planning, but because of the surprise and brilliant tactics of Alexander's officers (or actually, I believe it was mostly Alexander himself). Alexander's middle (the phalanx), then advanced and fought a fierce enounter in the river's opposite bank. The greek mercenaries had the advantage of standing on the shore of the river against the Macedonian phalanx in the water.
III At the Persians' right wing, their cavalry (after first assault of Thessalians and Greek cavalry) advanced. This wing was supported by the reinforcements sent by Darius before the battle began, and was much superior in number than Parmenion's horseman. The left wing of Alexander's army was in great danger. The Persians pushed the allied cavalry back and there was a threat that they would soon manage to attack the phalanx from the side. In the middle the Greek mercenaries stood strong (at the river bank); showing stiff resistance against Alexander's phalanx trying to break their line. When the situation in the Macedonians' left was getting worse, in the middle, after stopping the phalanx's advance - the Persians recaptured the initiative and pushed the them back into the water. They then tried to attack the hypaspists using the gaps in their formation. But on the other hand, the Persian left was weakening and it's center was under threat of attack from all sides.
IV When the Persian left wing finally collapsed, Alexander's men did not start a pursuit, but attacked the Greek mercenaries from their rear, side and front. The Greek Mercenaries couldn't stand such an attack (as we all know their sides and back were extremely weak). In the same time Darius saw what was going on and in first reaction directed straight to Alexander. But as he started the attack, he saw that Alexander's Hetairoi had a great advantage over the Persian soldiers. Darius resigned and fled. When the Persians saw that their king had fled, they too, lost heart and fled in his example.
V
And finally, the last stage of the battle (my graphical vision of it) shows the right Persian wing having great success but, seeing the main part of their forces withdrawing, they could not continue to fight any longer because shortly, they would be cut off from their escape route and sandwiched between two (or more) allied forces. Thus, in spite of their success (although they didn't break through Parmenion's line) they started to withdraw. The whole Persian army started fleeing and Alexander started to pursue Darius, but with no success as you all know well. Alexander used the oblique formation tactic. Parmenion's task was to stop the Persians to the end of battle and he performed his task with success but as I tried to show, there was greatest danger in that area during the whole battle. However, Alexander's right wing managed to sucessfully break through to put a decisive victory to the battle.
All Battle Maps are (c) by and are the works of Maciek. |